Your Nintendo Switch’s 64GB of internal storage fills up fast. A few AAA games and you’re already scrambling to manage what stays and what goes. That’s where a micro SD card comes in, it’s not optional if you’re serious about your digital library. But if you’ve never done it before, the prospect of popping open your console can feel a bit daunting. The good news? Inserting a micro SD card into your Switch is actually one of the simplest hardware modifications you can make. This guide walks you through exactly where to find that slot, how to insert the card safely, and how to get the most out of your expanded storage. Whether you’re running a standard Switch, the OLED model, or the Lite version, we’ve got you covered.
Key Takeaways
- The micro SD card slot on your Nintendo Switch is located on the back of the console near the bottom, opposite the USB-C charging port, and is accessible without any tools—just your fingernail and steady hands.
- Choose a UHS-II microSDXC card with at least 128GB capacity from reputable brands like SanDisk or Samsung to avoid counterfeit cards and ensure long-term reliability for your gaming library.
- Where to insert your micro SD card: power off your Switch completely, insert the card with gold contacts facing the back of the console, push until you hear a click, then power on and format it in System Settings.
- A quality micro SD card transforms your Switch from a device requiring constant storage management into one that can hold 20-40+ games simultaneously without deletion decisions.
- Maintain your expanded storage by keeping the card clean, ejecting properly before removal, avoiding extreme temperatures, and monitoring for signs of failure like unexpected crashes or read errors.
Why You Need A Micro SD Card For Your Nintendo Switch
Storage Limitations Of The Switch
The Nintendo Switch comes with 32GB of internal storage on the standard and OLED models (the Lite has the same). Sounds decent until you realize that the actual usable space is closer to 26GB once you account for the system software and reserved space. A single modern game like The Legend of Zelda: Tears of the Kingdom runs 18.2GB. Baldur’s Gate 3 takes up 150GB, yes, you read that right. Even modest indie titles clock in at 5-10GB these days. After two or three games, you’re hitting that storage wall hard.
Without a micro SD card, you’re constantly in a state of digital triage: delete this to install that. It’s not just inconvenient: it’s frustrating when you want to hop back into a game you uninstalled months ago. Reinstalling is possible, but who wants to spend 30 minutes to an hour downloading a game you already own?
Digital Game Libraries And Expansion Benefits
If you’re building a digital library, and let’s be honest, most Switch owners are moving that direction, expandable storage becomes essential. A quality micro SD card (256GB or higher) essentially turns your Switch into a console that can hold 20, 30, or even 40+ games at once. No more deletion decisions. No more download queues.
Beyond sheer capacity, expanded storage means faster access to your games. Games load from a quality micro SD card at nearly the same speed as they would from internal storage, especially with UHS-II compliant cards. You’ll save screenshots and video captures directly to the card. You can back up game saves (though not to the card itself, they stay on the system). Basically, a micro SD card transforms the Switch from a device you’re always managing to one you actually enjoy using.
Patch downloads, DLC, and game updates also consume space. A 128GB or 256GB card gives you breathing room for all of it without constantly cleaning house.
Before You Start: What You Need To Know
Choosing The Right Micro SD Card
Not all micro SD cards are created equal, and your Switch isn’t picky, it just works better with certain ones. You’ll want either a microSD UHS-II or microSDXC UHS-II card. The “UHS-II” part matters because it supports faster transfer speeds. Cards without UHS-II will still work, but they’re slower and you might notice lag during certain operations.
Capacity-wise, here’s the breakdown:
- 64GB: Entry-level option. Gets you through 4-6 games depending on size.
- 128GB: Sweet spot for most players. Holds 10-15 games comfortably.
- 256GB: Best long-term investment. Holds 25+ games and gives you room to grow.
- 512GB+: Overkill for most players, but there if you want it.
Speed class matters less than you’d think for the Switch, the console doesn’t need blazing-fast cards. Look for cards with “V30” or “U3” ratings (video speed class). This means they’ll maintain at least 30MB/s write speed, which is plenty for game installations and video capture.
Brands matter more than speed ratings. Stick with reputable manufacturers: SanDisk, Kingston, or Samsung. Avoid no-name brands off sketchy marketplace listings, counterfeits are disturbingly common, and a fake card will either fail immediately or degrade after a few months.
Compatibility And Speed Requirements
Here’s the thing: the Nintendo Switch supports micro SD cards up to 2TB in capacity. Technically, cards larger than 256GB exist and work, but you won’t find much benefit since your entire game library will fit anyway. The real compatibility constraint isn’t capacity, it’s form factor. You need a microSD card, not a full-size SD card. The micro version is about the size of your pinky nail.
Speed requirements are minimal. The Switch tops out at around 90MB/s read speed on internal storage and standard micro SD cards. Grabbing a premium UHS-II card does help with file transfers and occasional lag reduction, but you won’t notice a massive performance jump in actual gameplay. What matters most is stability and longevity. A reliable 256GB card from SanDisk or Samsung will outlast cheaper alternatives.
One critical detail: the Switch officially supports microSDXC cards (those over 64GB). Older microSD and microSDHC cards (up to 64GB) technically work, but are getting harder to find and aren’t worth buying new. Go straight for a microSDXC option in your desired capacity.
Locating The Micro SD Card Slot On Your Switch
Finding The Slot On Standard Switch Models
The micro SD card slot on the standard Nintendo Switch is hidden but accessible. Grab your Switch and look at the bottom, the end opposite the USB-C charging port. You’ll see a rectangular indentation on the back. That’s your target. The slot is small and easy to miss if you don’t know where to look, but once you spot it, it’s unmistakable.
The slot sits flush with the back casing, so there’s no protruding door or panel to unscrew. This is by design: Nintendo wanted the insertion to be simple while keeping the port protected from accidental damage during normal use. The opening is just large enough to accommodate a micro SD card and a fingernail.
You don’t need any tools. No special ejection pin, no screwdriver, no fiddling. Just your micro SD card and steady hands. The mechanism is spring-loaded, so once you understand how it works (we’ll cover that in the next section), the rest is intuitive.
OLED And Lite Model Differences
Good news: the location is identical on the Nintendo Switch OLED and the Switch Lite. Both models have the micro SD card slot on the back, near the bottom, in the same general position as the standard Switch. If you’ve ever inserted a card into a standard model, the Lite and OLED will feel familiar immediately.
The only difference is ergonomics. The Lite is smaller and lighter, so accessing the slot can feel slightly tighter if you have larger hands. The OLED model is the same size as the standard Switch, so no issues there. Regardless of which model you own, the slot location and insertion process are virtually identical. We’ve tested the process on all three, and the only variable is hand comfort, the actual mechanics don’t change.
Inserting Your Micro SD Card: The Complete Process
Preparation And Positioning
Before you touch anything, power off your Switch completely. Don’t put it in sleep mode, actually shut it down. Hold the power button on the top-left of the console for about three seconds until the shutdown menu appears, then confirm. This is a safety measure that prevents accidental file corruption if something goes wrong.
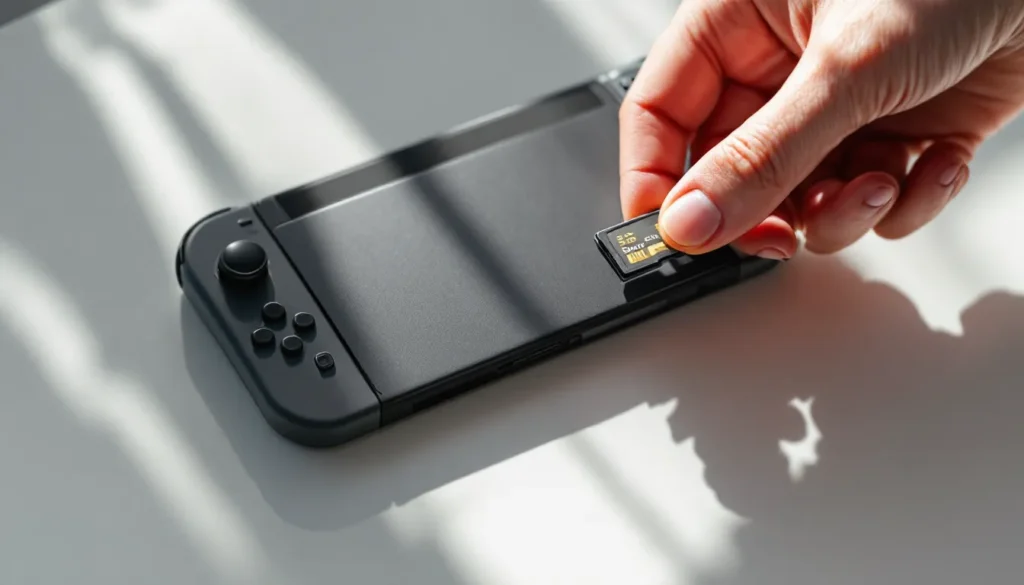
Once the Switch is off, grab your micro SD card. Hold it with the gold contacts facing toward the back of the Switch (not toward the front). The card should sit flat in your palm with the label side (usually facing up) clearly visible. Orientation matters, you can only insert it one way, and the gold contacts have to face the right direction for it to make contact with the reader.
Position yourself with good lighting. You don’t need a flashlight unless you’re in a dark room, but you do need to see what you’re doing. The slot is small enough that fumbling around in dim light is asking for trouble. Sit down, stabilize your Switch on a table or in your lap, and get comfortable. You’re not in a race.
Proper Insertion Technique And Safety Tips
Locate the slot on the back of your Switch, near the bottom. Use your fingernail or a soft plastic tool (Nintendo includes nothing in the box, so a fingernail works perfectly fine). Gently press into the slot opening. You’ll feel a slight resistance, the spring-loaded mechanism inside.
Grasp the micro SD card firmly between your thumb and index finger, keeping it level. Slide it into the slot with the gold contacts facing the back of the console. Push steadily and smoothly. Don’t force it: if you feel strong resistance, stop and check the orientation. The card should slide in with light to moderate pressure and will go in about three-quarters of the way. Don’t try to push it all the way until it’s flush, that’s not how it works.
Once inserted, you’ll hear a faint click or feel a subtle catch. That’s the card seating in the reader. Some players report hearing nothing at all, which is fine. The card is now locked in place. If you gently tug on it, it won’t slide back out, the spring-loaded mechanism is holding it secure.
Key safety tips:
- Never force the card. If it’s not sliding smoothly, check the orientation. You can damage both the card and the reader with excessive pressure.
- Keep your Switch powered off. This eliminates any risk of electrical issues during insertion.
- Don’t insert anything else into the slot. The micro SD card is the only thing that goes in there. The slot isn’t a charging port or an audio jack.
- Avoid static electricity. If you’re in a very dry environment, touch a metal object or the console frame before handling the card to discharge any static buildup.
Confirming Recognition And Initialization
Power your Switch back on by holding the power button for a few seconds. Once the home screen loads, navigate to System Settings (the gear icon). Scroll down and select System. Look for Manage microSD Card or Format microSD Card (the exact menu name varies slightly by software version).
The Switch will recognize the card automatically and display its total capacity. If you see your card’s capacity listed (256GB, 512GB, etc.), you’re golden. The card is recognized and ready to use.
The system will offer to format the card for use with your Switch. Say yes. Formatting initializes the file system so the Switch can write game data to it. This process takes a minute or two and will wipe any existing data on the card, so make sure it’s either new or you’ve backed up anything important. Once formatting is complete, you’ll see the available space displayed on your Switch home screen, usually in the bottom-right corner of the screen showing total internal storage plus SD card capacity combined.
That’s it. Your micro SD card is now active. Download or reinstall games, and they’ll save to the card automatically once internal storage is full, or you can manually select the card as the installation destination during download.
Troubleshooting Common Insertion Issues
Card Not Being Recognized
You’ve inserted the card, powered on your Switch, but there’s no mention of a micro SD card in the settings menu. First, power off again and check the card’s orientation. Pop it back out, it’ll pop out partially when you push it inward slightly, like a spring, and reinsert it making sure the gold contacts are facing the back of the console.
If the card still isn’t recognized after reinsertion, test the card on a computer. Use a micro SD card reader (or a USB card reader with a micro SD slot) and plug it into your PC or Mac. If the computer recognizes it, the card is fine, the problem is likely the slot on your Switch. If the computer doesn’t recognize it either, the card itself is defective or a counterfeit. If you bought it from an official retailer with a warranty, contact them for a replacement.
In rare cases, the Switch’s micro SD card reader can go bad. This usually only happens after years of use or physical damage. If you’ve ruled out the card and you’re certain the orientation is correct, your Switch’s reader may need replacement, a task requiring opening the console, which most players should take to a repair center.
One more check: some micro SD cards have a read-only lock switch on the side (tiny sliding switch). If yours has one, make sure it’s not engaged. A locked card won’t be recognized by the Switch.
Ejection Problems And Removal Difficulties
Need to remove your card? Power off the console first. Locate the card slot again. Using your fingernail or a soft plastic tool, push firmly into the slot opening. You’ll feel the card give slightly, it’s held by a spring mechanism. Push until you hear a distinct click, then release. The card will pop out about an inch, and you can grip it and pull the rest of the way.
If the card won’t pop out, don’t force it. Forcing can damage both the card and the reader. Instead, try a different tool: a plastic opening pick, a credit card edge, or even a guitar pick works great. The goal is gentle, steady pressure from a flat tool, not prying or twisting.
In extremely rare cases, a card can jam in the slot due to a misaligned entry or debris. If you suspect this, power off, ensure the console is cool, and try again with patience. If it still won’t budge, bring it to a repair center. Trying to force it out risks permanent damage to the reader.
After removal, store the card in a protective case (most quality cards come with one). Keep it away from extreme temperatures, moisture, and physical bending. Micro SD cards are tough, but they’re not indestructible.
Maximizing Your Expanded Storage
Managing Game Files And Organization
Once your card is in and formatted, you’ve got space. The question becomes: how do you manage it? The Switch doesn’t have folder structures or custom organization options. All your games are listed on the home screen, organized by most recently played or alphabetically. For most players, this is fine, your library auto-sorts itself.
But, managing space requires intention. Keep tabs on how much free space you have. You can free up space on your Nintendo Switch by archiving games you’re not currently playing. Archiving removes the game but keeps your save data intact, freeing up gigabytes. When you want to play an archived game again, the Switch re-downloads it from your library.
Nintendo games, third-party AAA titles, and indie games all live together on your SD card. There’s no way to force certain games to internal storage and others to the card, the Switch chooses automatically based on available space. This isn’t a problem in practice since the performance difference is negligible, but it’s worth knowing.
Screenshots and video captures save to your SD card by default. If you’re a content creator or just like to clip gameplay, expect your storage to fill up faster than you’d think. A 15-second video capture at 1080p uses about 150-200MB of space. Delete old clips periodically or back them up to a computer.
Best Practices For Long-Term Storage
Your micro SD card will last years if treated well, but longevity requires basic care. First: keep it clean. The gold contacts can accumulate dust or residue over time. Wipe them gently with a soft, dry cloth every few months. Don’t use water or cleaning solutions, just dry cloth.
Second: avoid extreme temperatures. Don’t leave your Switch in a hot car or a freezing garage. Micro SD cards are rated for storage at 0°C to 60°C and operation at 0°C to 45°C. Most homes fall well within that range, but if you’re storing the console for an extended period, keep it in a cool, dry place.
Third: eject properly. Always power off before removing the card and use the spring mechanism to pop it out. Don’t yank it out while the Switch is on or in sleep mode, this can corrupt data or damage the reader.
Fourth: monitor the card’s health. As a general rule, micro SD cards last 10-30 years before degradation becomes noticeable. Most players will upgrade their Switch or get a new card long before that becomes relevant. But, if you’re suddenly experiencing crashes, corrupted game data, or files that won’t open, the card may be failing. Back up important save data and consider replacement.
Fifth: choose quality over price. Reputable gaming sites regularly discuss storage options for the Switch. Spend the extra $10-20 on a SanDisk or Samsung card rather than taking a chance on no-name brands. A card failure mid-game is far more expensive in time and frustration than the upfront cost difference.
Maintaining And Protecting Your Micro SD Card
Your micro SD card is small but essential infrastructure for your Switch experience. Protection starts with a case. Quality micro SD cards come with a protective case (often a plastic shell or metal holder). Use it. Keep your card in its case when not in the console. This prevents physical damage, dust accumulation, and accidental insertion of the card into something else.
Handle the card by its edges, not the gold contacts. Your fingers carry oils and can leave residue on the contacts, reducing reliability over time. If you do touch the contacts, a quick wipe with a dry cloth fixes it, but avoiding contact altogether is smarter.
Regularly back up your game saves. While your save data is technically stored on the Switch’s internal memory (not the card), it’s still vulnerable to loss if your console dies or the system is damaged. The Switch doesn’t have built-in cloud backup for most games without a Nintendo Switch Online subscription, but with Nintendo Switch Online membership, you can back up saves automatically. This doesn’t protect the card itself, but it protects what matters most, your progress.
Monitor for signs of failure: games that crash unexpectedly, read errors when accessing files, or files that won’t load properly. These are rare, but they happen. If you notice them consistently, replace the card sooner rather than later. Most micro SD cards carry a 5-10 year warranty, so if yours fails prematurely, you might be eligible for replacement.
Finally, avoid updating your console OS while the card is actively being written to. This is an edge case scenario, but during game installations or large file transfers, the card is busy. It’s extremely unlikely to cause issues, but waiting until transfers complete before updating is the safest move.
Your micro SD card is a one-time purchase that pays dividends for years. Proper maintenance takes about two minutes of thought per month, a small investment for reliable, expanded storage that transforms how you use your Switch.
Conclusion
Inserting a micro SD card into your Nintendo Switch is genuinely one of the most straightforward hardware upgrades you can make. The process takes less than five minutes, costs around $30-50 for a solid 256GB card, and solves the storage problem that plagues every Switch owner eventually.
The key steps: buy a quality UHS-II microSDXC card from a reputable brand, power off your console, insert the card into the slot on the back of your Switch with the gold contacts facing the console, power back on, and format it in the system settings. That’s the entire process.
After insertion, you’ll wonder how you ever lived with just 64GB. You’ll maintain a library of 20+ games without thinking twice. You’ll stop playing the deletion game. You’ll actually enjoy managing your content instead of constantly fighting for space.
The one thing to avoid: cheap no-name cards from sketchy sellers. Counterfeit micro SD cards are common, and a failed card will either stop working immediately or corrupt your game library after a few weeks. Spend the money on the real thing. Your gaming experience depends on it, and you’ll get years of use from a quality card.
If you’re still hesitant about opening up your console, remember that this isn’t surgery. The micro SD card slot was designed to be user-friendly, and Nintendo expects owners to expand their storage. Thousands of gamers do this every day without issue. You’ll be fine. Grab a card, follow these steps, and enjoy the extra space.